The eyes on a custom pony are quite possibly even more important than the symbol. They are what makes your pony truly unique to you, and everyone has different ways of painting them. Many custom collectors look out for finished eyes, since sometimes a pony can look unfinished if the eyes are the only thing about a custom pony that hasn’t been ‘redone’.
Supplies:
- Inspiring Pictures
- Sketch of Design
- Pony for Customizing
- Acrylic Paints
- Gloss Varnish
- Water
- Brushes
- Ink Pen
- Q-Tips (cotton buds)
- Acetone

You will need some inspiring pictures, a sketch of your design, a pony, acrylic paints, gloss varnish, water, brushes, tissues, ink pen, pencil, cotton buds and acetone.
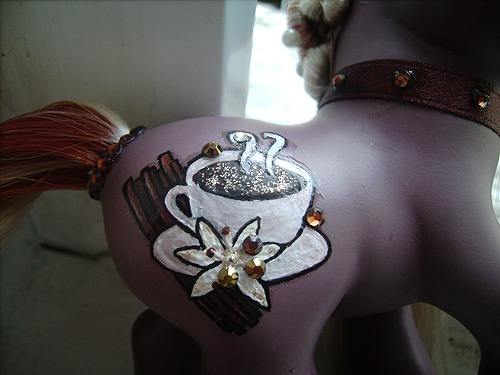
First of all, sketch out some eye designs. Drawing the eyes on paper will help your hand become used to the flow of the shape – painting eyes is a tricky business and you need as much practice as possible! This is my eye design to match my coffee pony:

Painting The Eyes
Some people remove the eye completely. I tend to keep the original eye as a template. First off, paint a thin layer of white over the eyes. When it dries paint another, building up the white slowly but keeping the iris relatively visible.

Once you’ve painted your white layers, paint a black circle over the original iris.

Now it’s time to add in the colour. Layer the iris up in thin layers using dark and light colours to achieve a more ‘3D’ effect.

You can now add in the pupil.

Now for the eyeliner. This can be a little tricky since you need a thin brush that has a nice neat point at the end – there can be no little stray strands of brush poking out anywhere, else the eyeliner will turn out a little messy.

Remember how your hand moved during your practice sketches? Try to replicate the movement and paint in slow, smooth strokes. Make sure your sketch is next to you so you can keep referring back to it.

The hard part is over! Add in your little highlight dots…

…and finish off with your gloss varnish. For eyes, I tend to use four layers of gloss to make them extra shiny, but always wait for each layer to dry (again, approximately 15 minutes) before applying the next one.

(The difficulty is matching the eyes on both sides, but with patience you will get there in the end! I tend to do them both at the same time. Just remember to keep your acetone and cotton buds handy!)
Need to paint symbols? Check out our Symbols Tutorial.
About the Author: Elwythili has been customizing since 2008 and specializes in elegant designs, inspired by nature and the romance of eras past. You can visit her website to see more of her work, which she also offers for sale. Don’t forget to sign her Guestbook!
Website: www.elwythilicustoms.webs.com